Templates
Templates give you a reusable starting point for procurement packages: build one once, and use it every time.
Good to know
Templates are managed by approvers. If you don’t see Templates in the sidebar, you may not have access.
Your templates list
Click Templates in the sidebar to open your organization’s full list. A breadcrumb (Home › Templates) sits at the top, and the table shows four columns by default — Name, Status, Categories, and Updated — plus a … menu on each row.
Creating a new template
- Name your template. This is required — the Create template button stays greyed out until you enter one.
- Add categories (optional). Type to search existing categories, or create a new one on the fly. You can pick more than one.
- Click Create template. It appears in the list right away and opens ready for you to build out.
Tip
New templates start out with one document (“Document 1”) and one section (“Section 1”). You fill those in inside the editor.
Managing categories
Categories keep templates organized and easy to find. Click the Categories field and start typing to search, or type a new name and click the + button to create it — it’s instantly available for this and future templates.
Hover over any existing category to reveal a pencil (edit) and trash (delete) icon.
Finding templates fast
- Filter by status: click Status and choose Active or Inactive. Click Reset to clear it.
- Search by name: start typing in Filter templates — the list updates as you type.
Choosing what you see
Click View to control which columns appear: Categories, Documents, Sections, Created By, Created At, and Updated At are all optional. Use Search columns if you’re hunting for a specific one. The Name column always stays visible.
Prefer cards over rows? Click Grid in the top-right. Each card shows the name, status, when it was last updated, who created it, any tags, and how many documents and sections it holds. Click Table to switch back.
Managing a template
Click the … menu on any row:
| Option | What it does |
|---|---|
| Edit template | Opens the template in the editor. |
| Rename | Changes the name inline. |
| Activate / Deactivate | Toggles whether the template is available for use. |
| Duplicate | Active templates only — creates a copy you can customize. |
| Delete | Shown in red. Permanently removes the template, with a confirmation step first. |
Good to know
Only inactive templates can be deleted. If a template is active, deactivate it first — that goes for bulk selections too.
Selecting several at once, and paging
Use the checkboxes to select one or more templates; a Group delete option appears. Click the × next to it to clear your selection.
At the bottom of the table you’ll find how many rows are selected, a Rows per page dropdown (10 by default), the current page, and arrows to jump to the first, previous, next, or last page.
The template editor
From the … menu on any inactive template, choose Edit template. The editor opens in the centre of the screen, with the breadcrumb updating to show where you are (Home › Templates › your template name).
Inside you’ll find a document area with a collapsible Header at the top, a Footer at the bottom, one or more sections in between, and a Grounding Documents panel on the right.
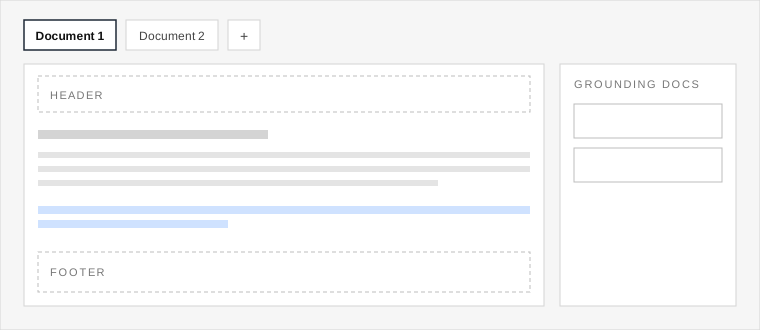
The template editor — document tabs, header and footer, sections, and the grounding documents panel. Blue text is locked verbiage.
Working with documents
- Add one: click the + button next to the tabs.
- Rename one: double-click its tab, type, then press Enter or click away.
- Reorder: click and hold a tab, then drag it into place.
- Delete one: click the × on its tab and confirm. Every template needs at least one document, so the last one can’t be deleted.
Editing the header and footer
Click Header or Footer to expand it. Each supports an image and text, with Save and Cancel once you start editing.
Click Image to upload, click into the text field to type, then Save to keep your changes or Cancel to revert to the last saved version.
Note
If you remove an image and then cancel, the image stays removed. Only text changes are reverted.
Working with sections
- Add a section: click + New Section at the bottom of the editor.
- Rename one: click directly on its name, or use the pencil icon next to the … menu.
- Reorder or remove: open its … menu for Move up, Move down, or Delete. Move up and down are greyed out when a section is already at the top or bottom.
A word and character count at the bottom left updates as you add content.
Adding reference material
The Grounding Documents panel on the right lets you upload reference files that guide AI-generated content for anyone who builds a package from this template later.
Click Click to upload or the + icon, choose one or more files, and they’re ready to use.
Locking text that shouldn’t change
Some language — a legal disclaimer, standard instructions — needs to stay exactly as written.
- Highlight the text you want to protect.
- Click the lock icon in the editor ribbon.
- Activate the template so it’s ready for others.
Locked text shows in blue and can’t be edited by people using the template.